|
Enrypt websites with HTML Guardian's Site Manager
The Site Manager is a tool that allows you to encrypt
web sites entirely with just a few clicks.
You only have to configure the settings for a given site once and then
you can encrypt it in seconds each time you make some changes.
To open the Site Manager, click 'Site Manager' under
the 'Tools' menu, or press Ctrl + R
How the Site Manager works:
When you encrypt some website, the Site Manager will create a new folder
to store the encrypted site files. Inside that folder the Site Manager
will create two separate encrypted copies of the original site - one
encrypted for 'All' browsers, and the other encrypted
for 'IE 5+' browsers - each copy will be in a separate
subfolder. A new index file that detects the browser type and redirects
the visitor to the appropriate encrypted copy of the site will be
generated automatically.
All the files from the site root folder will be copied to the encrypted
site folder, even the files which HTML Guardian can not process (flash
animations, sound files etc.).
The reason to have two encrypted copies of the site is simple. If you
want your encrypted site to be compatible with any browser, you'll
have to use the default encryption method for 'All' browsers.
On the other hand, the 'IE 5+' encryption method is
better and faster, and now more than 90% of web surfers use IE 5.0 or
higher browser. When you have two encrypted copies of the site, IE 5+
browsers will be redirected to the copy encrypted specifically for them,
and the rest will be redirected to the other copy - this ensures the
best possible performance.
The Site Manager window has 3 main parts:
- Files settings (at the top) - here you can specify
the protection options for each file individually.
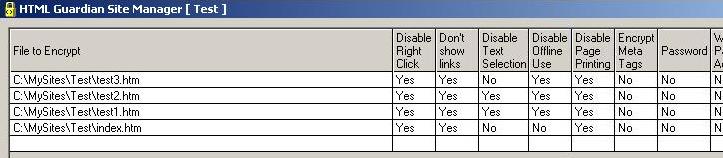

To change / edit some option, just double click the appropriate cell.
Click Add File(s) to add new files to the site, for
example files created after the site was defined. You can only add files
which reside inside the site root folder.
Hold down the Ctrl or Shift keys to add multiple files at
once.
Click Remove File to remove a file from the site. If
you remove a file, it will not be encrypted. The original, unencrypted
file will be copied to the folder where the encrypted site is stored.
Click Apply settings to all files to apply the settings
for the currently selected file to all other files.
Click Save Site Settings to save the current site configuration.
It will be saved in a file with a .hgs extension in HTML Guardian's
installation folder.
Click Encrypt Site to encrypt the site. Depending on
the site size this may take some time, especially if Image
Protection is enabled - it may even look like the program
is not responding. Please wait until you see a message that the encryption
is finished.
Defined sites (bottom left) - here you can open existing
sites, create new ones, or delete defined sites.

In the Defined Sites list you can see all the sites you have already
defined.
Select one of them and click Load Site to open it for
editing and / or encryption.
To create a new site, click New Site. You have to configure
the following parameters:
- Site root folder - the folder where all files that belong to
that site reside. Only files inside that folder are considered a part
of the site.
- Site name - any name of your choice.
- The main file for the site - this is the file that the visitors
of your site will see if they type in the browser's address bar only
your domain without specifying a file. If for example you type in your
browser http://www.protware.com, you will see http://www.protware.com/default.htm
file - default.htm is the main file for our site. The main file is usually
named default.htm(l) or index.htm(l).
After you configure these settings, all appropriate files from the selected
Site root folder will be displayed in the Files settings list. You have
to configure the protection options for each file and then save the
site configuration - that's all, the site is ready for encryption.
Click Delete Site to remove a site from the list. The
only thing that will be deleted is the site definition file stored in
HTML Guardian's installation folder. No other file will be deleted.
Site settings(bottom right) - Displays information
about the settings of the currently loaded site.
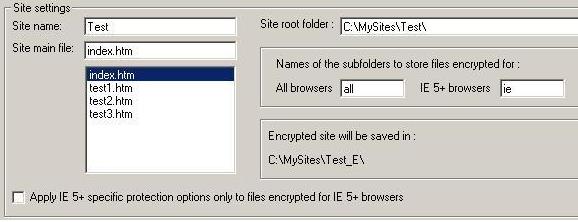

Site name - any name of your choice
Site main file - here you have to select the main file of the
site from the list of all files
Names of the subfolders to store encrypted files - here you can
specify the name of the subfolder where the files encrypted for 'All'
browsers will be stored and the name of the subfolder where the files
encrypted for 'IE 5+' browsers will be stored.
Encrypted site will be saved in: - The folder where encrypted
site will be saved. This folder can't be changed. It will be at the
same folder level as the site root folder and its name will be the the
site root folder name with _E
added at the end. If for example the site root folder is C:\MySites\Test\,
the encrypted site will be saved in C:\MySites\Test_E\
Note: If the folder where the encrypted site will be
saved exists, it will be deleted when you click the Encrypt Site button
and then it will be recreated again. You should not edit the files there
or add new ones because they will deleted the next time you encrypt
the site.
Apply IE 5+ specific protection options only to files encrypted for
IE 5+ browsers - the 'Disable Clipboard & PrintScreen' option
will only work for IE 5+ browsers. If this box is checked, this protection
option will be applied only to the files encrypted for IE 5+.
Customize browser layout section - here you can define exactly
how the browser window your site will be opened in will look like. By
removing some of the default browser layout elements you can get some
more screen space for your site, and you may limit visitors access to
browser menus.
Enable Address(URL) bar - if checked, the
browser's address bar will be visible (this is the field where you can
see the address of the currently loaded page, or to type a new address
to be visited).
Enable Menu bar - if checked, the browser's Menu bar
will be visible (the one with the File, Edit, View etc. menus).
Enable Tool bar - if checked, the browser's Tool bar
will be visible (the one with the Back, Forward, Stop, Refresh, Print
etc. buttons).
Enable Status bar - if checked, the browser's status
bar will be visible (this one is usually at the bottom of the browser
window. When you move the mouse over some link, you can see where this
link points to in the status bar).
If all the above four options are checked, Customized Browser Layout
will not be used because this is the same as the default browser layout
- in this case your settings will be ignored, and the site will be encrypted
as if the 'Customize browser layout' box was not checked.
FullScreen Mode - if checked, the browser will attempt
to maximize your site as much as possible, getting all the screen space
available. Fullscreen mode implementation varies across different browsers
and even across different versions, builds etc. In most cases for IE
5+ browsers, opening your site in FullScreen mode will hide the browser's
Title bar and the visitors will not be able to minimize the browser
window from the '_' button
or close it from the 'X'
button(closing the site may only be possible from the Task Manager).
Some notes about Customized Browser Layout:
Customized Browser Layout will not be applied for Netscape 4.x browsers
- this means any settings specified in the 'Customize Browser Layout'
section will not be applied if the site is visited with a Netscape 4.x
browser. The reason is the javascript engine of Netscape 4.x is really
bad (least to say) and this may cause a browser crash on less stable systems (like
Windows 9x/ME).
If you want, you can deny access to your site for certain browsers as
described here.
You should not use the so-called 'framebuster' scripts if you use Customized
Browser Layout option. These are scripts that check if the file is opened in
a frameset and remove the frameset(replace it with the file itself).
It will not be possible to open files that are a part of a site protected
with a Customized Browser Layout option in a new browser window because
the new window will be with the default browser layout, not with the one
specified by you.
If you want some of the files to be opened in a new browser window, you
should remove them from the site - they will be copied to the encrypted
site folder unmodified. You can then encrypt them separately. Such files
will be opened in a new browser window with the default browser layout.
Sites with customized browser layout should always be encrypted entirely.
If you modify some of your original html files, you should then
re-encrypt and upload again the entire site, not the modified file only
(if you modify an asp or a script(.js / .vbs) file, you don't have to
re-encrypt and reupload the entire site).
Uploading the encrypted site to your server
The folder where the encrypted site is saved will have one html file
and two subfolders inside, as in the picture below:
(If you used Customized Browser Layout, it will have 3 html files and
two subfolders inside)

You should upload the html file(s) and the two subfolders to the root
folder of your server.
- In case Customized Browser Layout was NOT used:
The html file is the new main page of your site. It will have the same
name as the file you specified as a main file for the site in the Site
Settings, but it will not be the same file. It will only detect the
browser type and will redirect the visitor to the appropriate encrypted
copy of the site. This file is not encrypted and you can edit it.
If you want, you can encrypt it before uploading the site - but you
must encrypt it for 'All' browsers. There is no sense
to use any of the additional protection options for this file, especially
you should not use the 'Referrer check' option.
- In case Customized Browser Layout was used:
Everything is the almost same as before - one of the 3 html files is
the new main page of your site. It will have the same name as the file
you specified as a main file for the site in the Site Settings, but
it will not be the same file. In this case this file will be encrypted.
The other two files (they will have random meaningless names) are created
by the Site Manager and should not be modified in any way, you just
have to upload them to the root folder of your server.
Important Note:
There could be many cases when someone may try to open a file encrypted
for IE 5+ browsers with IE4, Netscape, Opera etc., or to open a file
encrypted for All browsers with IE 5+. If the visitors start to browse
your site from the main page this can't happen - they will be redirected
to the appropriate encrypted version of the site automatically. But
this could happen if they go directly to some of your pages (from bookmarks,
from a link posted on another site etc.).
To prevent opening the encrypted files in an unsuitable browser, the
Site Manager inserts browser detection & redirection code in each
encrypted page. If the browser type and the encryption method do not
match, the visitor will be redirected to the main page.
Please take the above note into consideration
when you test the encrypted site:
- if you try to open any file encrypted for 'All' browsers with IE 5+,
you'll always be redirected to the main page of the copy of the site
encrypted for IE 5+
- if you try to open any file encrypted
for 'IE 5+' browsers with IE 4, Netscape, Opera etc., you'll always
be redirected to the main page of the copy of the site encrypted for
All browsers
This may look like a bug when you test the site, but it's not - this
simply ensures that no file will be loaded in an unsuitable browser
.
Using the Site Manager with Image Guardian
Image Protection
settings are not stored in the site definition files. This means the
images used in the currently loaded site will be protected if Image
Guardian is enabled, using the currently specified Image Guardian settings.
Your original images will not be copied to the encrypted site folder,
only the protected ones will be.
If Image Guardian is not enabled, images will not be protected - they
will be copied to the encrypted site folder unmodified.
Using the Site Manager with Profiles
All the settings from the currently loaded profile, except the ones
specified in the 'Default settings' tab, will be applied to the files
that belong to the currently encrypted site.
All the settings specified in the 'Default settings' tab for the currently
loaded profile will be ignored when you encrypt a site - the settings
specified for each file in the site definition file will be used instead.
If no profile is loaded when you encrypt a site, the default HTML Guardian
settings will be applied for all the options that can't be configured
from the Site Manager.
|